
If your computer audio stopped working correctly after connecting a USB or computer-controlled audiometer, Windows may have automatically changed your default audio device.
This is a common Windows behavior. When an audiometer is connected, Windows may recognize it as a new audio device and automatically select it for normal computer audio.
Common Symptoms
You may notice:
- Sound from videos, websites, or other programs no longer plays through your computer speakers.
- Audio files used within your audiometer software do not play correctly.
- Windows shows your audiometer as the selected speaker or output device.
- The problem started immediately after installing or connecting an audiometer.
How to Fix the Problem in Windows 11
1. Open Sound Settings
Leave your audiometer connected to the computer.
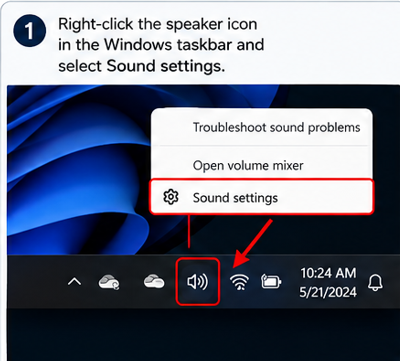
Right-click the speaker icon in the Windows taskbar and select Sound settings.
2. Select Your Normal Computer Speakers
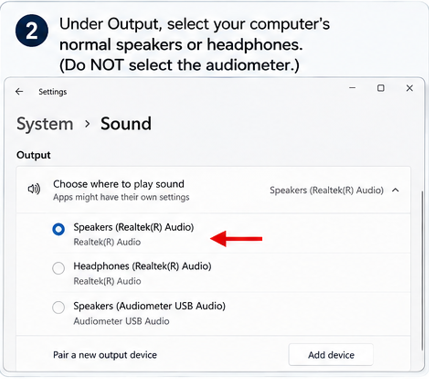
Under Output, locate your computer's normal speakers or headphones.
This may appear as:
- Speakers (Realtek Audio)
- or as another built-in audio device supplied by your computer manufacturer.
Select this device as your Windows output device.
3. Check the Default Playback Device
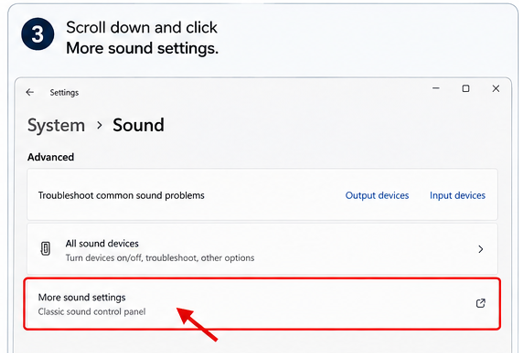
Scroll down in Sound Settings and select:
More sound settings
This will open the traditional Windows Sound control panel.
See below.
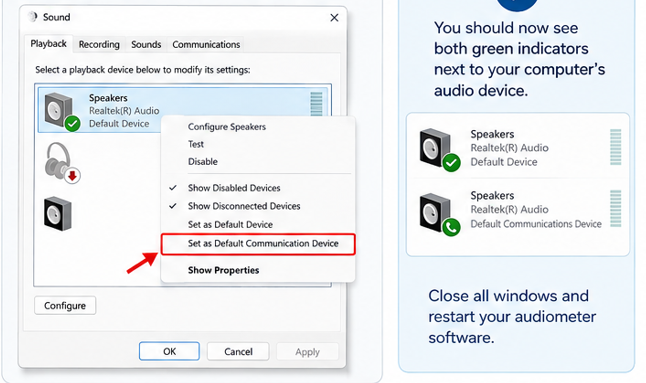
4. Set as Default device AND Default Communication Device
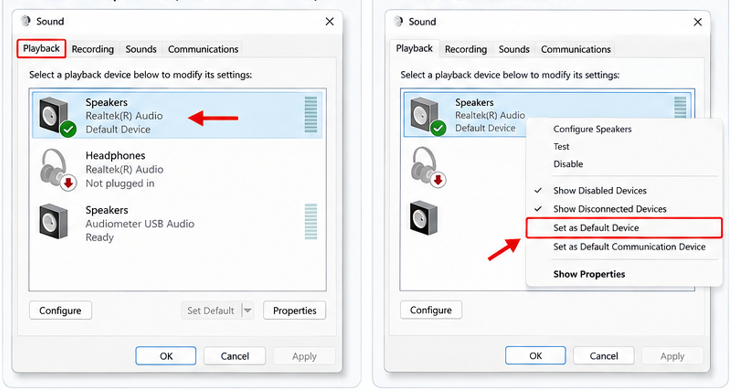
Select the Playback tab.
Find your computer's normal speaker or headphone device (Realtek).
Right-click the device and select:
- Set as Default Device
Then right-click it again and select:
- Set as Default Communication Device
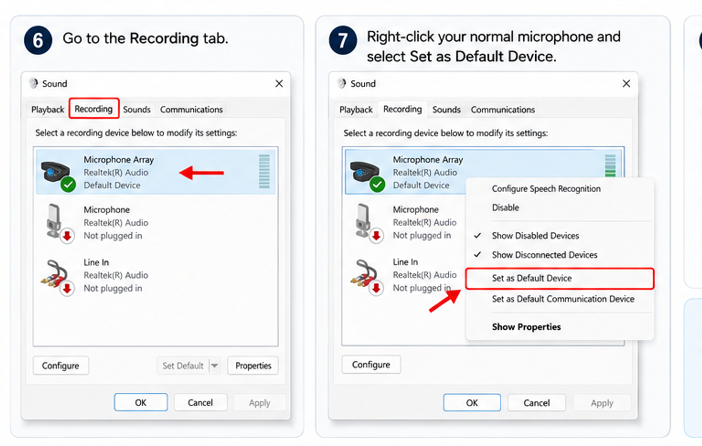
5. Change Default Device/Communication for Recording
The same MUST be done for the Recording tab as well:
Set default device/communication for your normal Micrpohone, Realtek, etc.
6. Restart Your Audiometer Software
Close and reopen your audiometer software after changing the Windows audio settings.
If the audiometer software has its own audio or hardware configuration settings, verify that the audiometer is still selected correctly within the software.
Important
Important
Do not disable the audiometer in Windows Sound settings unless instructed to do so by the equipment manufacturer or technical support.
Some computer-controlled audiometers use their USB audio interface as part of the testing system. Disabling the device may prevent the audiometer or certain testing functions from operating correctly.
The goal is to configure the computer so that:
- Normal Windows Audio → Computer Speakers
- Audiometric Testing → Audiometer controls via USB when software is running
No AUDIOMETER should be default for Playback or Recording, this includes Magnum, Otometrics, MedRX, Interacoustics, Inventis, etc.
Still Having Trouble?
If Windows continues changing your audio device or your audiometer software is not playing audio correctly, additional configuration may be required.
When contacting technical support, please have the audiometer manufacturer, model, and software version available. Screenshots of your Windows Sound settings can also be helpful when diagnosing the problem.
Medology Solutions
Audiology Equipment Service • Calibration • Technical Support